Neither MD5 nor SHA-1 is an "encryption" algorithm. Both are "hashing" algorithms.
In the simple sense, something that is encrypted can later be decrypted to get the original back.
Something that is properly hashed stays that way; it is a 'fingerprint' of the original pattern that cannot be 'dehashed' to reconstruct the original.
Ideally, there is only a single unique hash value that can be derived from each unique string of characters.
Of course, it's easy to prove that that's not possible when hash values are small -- small as in 160 or 256 or 512 bits. But in practice, because the strings of characters aren't random, because they're patterns of words more than just patterns of letters, the number of likely hash values gets smaller.
The value of unique hashes is that they can be used to verify that the original string hasn't been changed. If I send you a message along with a hash, you can run the message through the hash algorithm to see if the same hash value comes out. If it does, you can feel confident that you're reading exactly what was written.
Sunday, January 22, 2012

Writing a password encryptor in Java
Happy New Year everyone!
In a recent project, I need to write a password encryptor so that passwords using my shell scripts are not exposed in clear text. Note that this does not stop people from getting the passwords - it just does not expose the password in clear text.
After doing some research, I've decided to use AES to encrypt my password. It will take in 2 parameters - the key and the password.
Two problems arise:
1. The encryption method outputs in bytes - I need to handle this so that I can encode the byte output as a String (text) and then be able to decode it back to byte to decrypt it back. Many of the examples out there uses sun.misc.Base64Encoder but this is not encouraged (do a google to find out why). There are alternatives. Here's a good link on this. Basically using Apache Commons Codec or Base64.
But the better way if you are using Java6 is to use import javax.xml.bind.DatatypeConverter or else use JavaMail which provides Base64 encoding/decoding via MimeUtility.
In the end I used javax.xml.bind.DatatypeConverter since I am using Java6.
2. The second problem is since I am letting the users decide what key to use, I need to be able to hash the key via MD5 or SHA, then extract the bytes from the hash into the key byte[].
A good discussion on this can be found here.
Note: here's a good link on using DES to do this.
Anyway, here's my final code:
import javax.crypto.Cipher;
import javax.crypto.spec.*;
import java.security.MessageDigest;
import java.security.NoSuchAlgorithmException;
import javax.xml.bind.DatatypeConverter;
public class AES {
// init vector for randomness
static byte[] iv = { (byte) 0xcb, (byte) 0x53, (byte) 0x03, (byte) 0x0f,
(byte) 0xe0, (byte) 0x79, (byte) 0x9d, (byte) 0xdc, (byte) 0x80,
(byte) 0xa9, (byte) 0x83, (byte) 0xf1, (byte) 0x03, (byte) 0xb6,
(byte) 0x59, (byte) 0x83 };
public static void encryptText(String text, String password) throws Exception {
SecretKeySpec skeySpec = new SecretKeySpec(getKeyFromPassword(password), "AES");
IvParameterSpec ivSpec = new IvParameterSpec(iv);
Cipher aes = Cipher.getInstance("AES/CBC/PKCS5Padding");
aes.init(Cipher.ENCRYPT_MODE, skeySpec, ivSpec);
byte[] encrypted = aes.doFinal((text.getBytes()));
//System.out.println("Encrypted string: " + DatatypeConverter.printBase64Binary(encrypted));
System.out.println(DatatypeConverter.printBase64Binary(encrypted));
}
public static void decryptText(String encrypted, String password) throws Exception {
SecretKeySpec skeySpec = new SecretKeySpec(getKeyFromPassword(password), "AES");
IvParameterSpec ivSpec = new IvParameterSpec(iv);
Cipher aes = Cipher.getInstance("AES/CBC/PKCS5Padding");
aes.init(Cipher.DECRYPT_MODE, skeySpec, ivSpec);
//Cipher cipher = Cipher.getInstance("AES");
//cipher.init(Cipher.DECRYPT_MODE, skeySpec);
byte[] original = aes.doFinal(DatatypeConverter.parseBase64Binary(encrypted));
String originalString = new String(original);
// System.out.println("Decrypted string: " + originalString + " " + asHex(original));
System.out.println(originalString);
}
public static byte[] md5sum(byte[] buffer) {
try {
MessageDigest md5 = MessageDigest.getInstance("MD5");
md5.update(buffer);
return md5.digest();
} catch (NoSuchAlgorithmException e) {
System.out.println("MD5 Algorithm not available on this machine");
}
return null;
}
// converts key to machine readable form
public static byte[] getKeyFromPassword(String s) {
return md5sum(s.toString().getBytes());
}
// prints pretty error messages and exits
public static void errorExit(String s) {
System.out.println(s);
System.exit(0);
}
public static void main(String[] args) throws Exception {
String usage = "Usage: java AES [-e | -d] [text] [password]";
if (args.length < 2 || args.length > 3) {
errorExit(usage);
}
if (args[0].equalsIgnoreCase("-e")) {
encryptText(args[1], args[2]);
} else if (args[0].equalsIgnoreCase("-d")) {
decryptText(args[1], args[2]);
} else {
System.out.println(usage);
}
Runtime.getRuntime().gc(); // force flush
}
}
In a recent project, I need to write a password encryptor so that passwords using my shell scripts are not exposed in clear text. Note that this does not stop people from getting the passwords - it just does not expose the password in clear text.
After doing some research, I've decided to use AES to encrypt my password. It will take in 2 parameters - the key and the password.
Two problems arise:
1. The encryption method outputs in bytes - I need to handle this so that I can encode the byte output as a String (text) and then be able to decode it back to byte to decrypt it back. Many of the examples out there uses sun.misc.Base64Encoder but this is not encouraged (do a google to find out why). There are alternatives. Here's a good link on this. Basically using Apache Commons Codec or Base64.
But the better way if you are using Java6 is to use import javax.xml.bind.DatatypeConverter or else use JavaMail which provides Base64 encoding/decoding via MimeUtility.
In the end I used javax.xml.bind.DatatypeConverter since I am using Java6.
2. The second problem is since I am letting the users decide what key to use, I need to be able to hash the key via MD5 or SHA, then extract the bytes from the hash into the key byte[].
A good discussion on this can be found here.
Note: here's a good link on using DES to do this.
Anyway, here's my final code:
import javax.crypto.Cipher;
import javax.crypto.spec.*;
import java.security.MessageDigest;
import java.security.NoSuchAlgorithmException;
import javax.xml.bind.DatatypeConverter;
public class AES {
// init vector for randomness
static byte[] iv = { (byte) 0xcb, (byte) 0x53, (byte) 0x03, (byte) 0x0f,
(byte) 0xe0, (byte) 0x79, (byte) 0x9d, (byte) 0xdc, (byte) 0x80,
(byte) 0xa9, (byte) 0x83, (byte) 0xf1, (byte) 0x03, (byte) 0xb6,
(byte) 0x59, (byte) 0x83 };
public static void encryptText(String text, String password) throws Exception {
SecretKeySpec skeySpec = new SecretKeySpec(getKeyFromPassword(password), "AES");
IvParameterSpec ivSpec = new IvParameterSpec(iv);
Cipher aes = Cipher.getInstance("AES/CBC/PKCS5Padding");
aes.init(Cipher.ENCRYPT_MODE, skeySpec, ivSpec);
byte[] encrypted = aes.doFinal((text.getBytes()));
//System.out.println("Encrypted string: " + DatatypeConverter.printBase64Binary(encrypted));
System.out.println(DatatypeConverter.printBase64Binary(encrypted));
}
public static void decryptText(String encrypted, String password) throws Exception {
SecretKeySpec skeySpec = new SecretKeySpec(getKeyFromPassword(password), "AES");
IvParameterSpec ivSpec = new IvParameterSpec(iv);
Cipher aes = Cipher.getInstance("AES/CBC/PKCS5Padding");
aes.init(Cipher.DECRYPT_MODE, skeySpec, ivSpec);
//Cipher cipher = Cipher.getInstance("AES");
//cipher.init(Cipher.DECRYPT_MODE, skeySpec);
byte[] original = aes.doFinal(DatatypeConverter.parseBase64Binary(encrypted));
String originalString = new String(original);
// System.out.println("Decrypted string: " + originalString + " " + asHex(original));
System.out.println(originalString);
}
public static byte[] md5sum(byte[] buffer) {
try {
MessageDigest md5 = MessageDigest.getInstance("MD5");
md5.update(buffer);
return md5.digest();
} catch (NoSuchAlgorithmException e) {
System.out.println("MD5 Algorithm not available on this machine");
}
return null;
}
// converts key to machine readable form
public static byte[] getKeyFromPassword(String s) {
return md5sum(s.toString().getBytes());
}
// prints pretty error messages and exits
public static void errorExit(String s) {
System.out.println(s);
System.exit(0);
}
public static void main(String[] args) throws Exception {
String usage = "Usage: java AES [-e | -d] [text] [password]";
if (args.length < 2 || args.length > 3) {
errorExit(usage);
}
if (args[0].equalsIgnoreCase("-e")) {
encryptText(args[1], args[2]);
} else if (args[0].equalsIgnoreCase("-d")) {
decryptText(args[1], args[2]);
} else {
System.out.println(usage);
}
Runtime.getRuntime().gc(); // force flush
}
}
Sunday, December 18, 2011
JAXB can't handle interfaces
If you get the following error:
Caused by: com.sun.xml.internal.bind.v2.runtime.IllegalAnnotationsException: 2 counts of IllegalAnnotationExceptions com.unicacorp.interact.api.NameValuePair is an interface, and JAXB can't handle interfaces. this problem is related to the following location:
at com.unicacorp.interact.api.NameValuePair
at public com.unicacorp.interact.api.NameValuePair[] com.singtel
.ma.rto.jaxws.GetCustomerOffers.arg6
at com.singtel.ma.rto.jaxws.GetCustomerOffershttp://www.blogger.com/img/blank.gif
com.unicacorp.interact.api.NameValuePair does not have a no-arg default construc
tor.
this problem is related to the following location:
at com.unicacorp.interact.api.NameValuePairhttp://www.blogger.com/img/blank.gif
at public com.unicacorp.interact.api.NameValuePair[] com.singtel
.ma.rto.jaxws.GetCustomerOffers.arg6
at com.singtel.ma.rto.jaxws.GetCustomerOffers
Make sure you are using the right classes (not interface). If you really need to use interface, check out this link
Adding the "@XmlJavaTypeAdapter(AnyTypeAdapter.class)" annotation to the object interface solved this problem by telling JAXB to use a special type adapter needed for interfaces. @XmlJavaTypeAdapter(AnyTypeAdapter.class) @XmlRootElement public interface MyObject { ... }
Note: The AnyTypeAdapter.java source code is very simple and can be readily found online.
Marshalling Error Encountered
It turns out that adding the AnyTypeAdapter annotation was only part of the solution. Although this annotation lets the web service start successfully, the first call to getMyObjects() resulted in a marshalling error.
INFO: Interceptor has thrown exception, unwinding noworg.apache.cxf.interceptor.Fault: Marshalling Error: class com.attivio.webservice.WebServiceTest$MyObjectImpl1 nor any of its super class is known to this context. Caused by: javax.xml.bind.MarshalException - with linked exception: [javax.xml.bind.JAXBException: class com.attivio.webservice.WebServiceTest$MyObjectImpl1 nor any of its super class is known to this context.]
The final piece of the puzzle was solved by creating a per-module interface, MyApi1, which extends MyApi and has the “@XmlSeeAlso({MyObjectImpl1.class, MyObjectImpl2.class})” annotation. By extending this interface and registering it as the endpoint class, JAXB was able to find the appropriate implementations of the MyObject interface for serialization. By putting the annotation on a module specific interface, instead of the base interface, different modules can have different objects and APIs without the need to know details of the other modules.
@WebService @XmlSeeAlso({MyObjectImpl1.class, MyObjectImpl2.class}) public interface MyApi1 extends MyApi { } public static class MyApiImpl implements MyApi1 { ... }
Caused by: com.sun.xml.internal.bind.v2.runtime.IllegalAnnotationsException: 2 counts of IllegalAnnotationExceptions com.unicacorp.interact.api.NameValuePair is an interface, and JAXB can't handle interfaces. this problem is related to the following location:
at com.unicacorp.interact.api.NameValuePair
at public com.unicacorp.interact.api.NameValuePair[] com.singtel
.ma.rto.jaxws.GetCustomerOffers.arg6
at com.singtel.ma.rto.jaxws.GetCustomerOffershttp://www.blogger.com/img/blank.gif
com.unicacorp.interact.api.NameValuePair does not have a no-arg default construc
tor.
this problem is related to the following location:
at com.unicacorp.interact.api.NameValuePairhttp://www.blogger.com/img/blank.gif
at public com.unicacorp.interact.api.NameValuePair[] com.singtel
.ma.rto.jaxws.GetCustomerOffers.arg6
at com.singtel.ma.rto.jaxws.GetCustomerOffers
Make sure you are using the right classes (not interface). If you really need to use interface, check out this link
Adding the "@XmlJavaTypeAdapter(AnyTypeAdapter.class)" annotation to the object interface solved this problem by telling JAXB to use a special type adapter needed for interfaces. @XmlJavaTypeAdapter(AnyTypeAdapter.class) @XmlRootElement public interface MyObject { ... }
Note: The AnyTypeAdapter.java source code is very simple and can be readily found online.
Marshalling Error Encountered
It turns out that adding the AnyTypeAdapter annotation was only part of the solution. Although this annotation lets the web service start successfully, the first call to getMyObjects() resulted in a marshalling error.
INFO: Interceptor has thrown exception, unwinding noworg.apache.cxf.interceptor.Fault: Marshalling Error: class com.attivio.webservice.WebServiceTest$MyObjectImpl1 nor any of its super class is known to this context. Caused by: javax.xml.bind.MarshalException - with linked exception: [javax.xml.bind.JAXBException: class com.attivio.webservice.WebServiceTest$MyObjectImpl1 nor any of its super class is known to this context.]
The final piece of the puzzle was solved by creating a per-module interface, MyApi1, which extends MyApi and has the “@XmlSeeAlso({MyObjectImpl1.class, MyObjectImpl2.class})” annotation. By extending this interface and registering it as the endpoint class, JAXB was able to find the appropriate implementations of the MyObject interface for serialization. By putting the annotation on a module specific interface, instead of the base interface, different modules can have different objects and APIs without the need to know details of the other modules.
@WebService @XmlSeeAlso({MyObjectImpl1.class, MyObjectImpl2.class}) public interface MyApi1 extends MyApi { } public static class MyApiImpl implements MyApi1 { ... }
Tuesday, October 4, 2011
WebSphere & JAX-WS
What better for a novice like me to learn how to deploy Webservices on WebSphere than to try it using hello world.
Here's my code:
1. Web Service Endpoint Interface
/**
*
*/
package com.singtel.ma.rto;
import javax.jws.WebMethod;
import javax.jws.WebService;
import javax.jws.soap.SOAPBinding;
import javax.jws.soap.SOAPBinding.Style;
/**
* @author Main Masrudyn
*
*/
//Service Endpoint Interface
@WebService
public interface RTO {
@WebMethod String getHelloWorldAsString(String name);
}
2. Web Service Endpoint Implementation
package com.singtel.ma.rto;
import javax.jws.WebMethod;
import javax.jws.WebService;
//Service Implementation
@WebService(endpointInterface = "com.singtel.ma.rto.RTO")
public class RTOImpl implements RTO {
public String getHelloWorldAsString(String name) {
return "Hello World JAX-WS " + name;
}
}
3. Deploy on WebSphere, choose Detailed:

4. Ensure Deploy Webservice

5. Click on Service providers - ensure listener start


6. Check the webservice is running : http://rhel55-32.mydomain.com:9080/RTO/RTOImplService/RTOImplService.wsdl

Here's my code:
1. Web Service Endpoint Interface
/**
*
*/
package com.singtel.ma.rto;
import javax.jws.WebMethod;
import javax.jws.WebService;
import javax.jws.soap.SOAPBinding;
import javax.jws.soap.SOAPBinding.Style;
/**
* @author Main Masrudyn
*
*/
//Service Endpoint Interface
@WebService
public interface RTO {
@WebMethod String getHelloWorldAsString(String name);
}
2. Web Service Endpoint Implementation
package com.singtel.ma.rto;
import javax.jws.WebMethod;
import javax.jws.WebService;
//Service Implementation
@WebService(endpointInterface = "com.singtel.ma.rto.RTO")
public class RTOImpl implements RTO {
public String getHelloWorldAsString(String name) {
return "Hello World JAX-WS " + name;
}
}
3. Deploy on WebSphere, choose Detailed:

4. Ensure Deploy Webservice

5. Click on Service providers - ensure listener start


6. Check the webservice is running : http://rhel55-32.mydomain.com:9080/RTO/RTOImplService/RTOImplService.wsdl

Tuesday, September 13, 2011
WebLogic Domains, Servers, Machines and Node Managers
It's been awhile since my last post. In my current project, I need to be able to use WebLogic more effectively - that got me started on using its servers/machines functionality.
Previously, I simply created a single domain and deployed all my apps on the Admin domain. According to my tech support, this is not best practice. Since my company apps is deployed as separate war files and each war is quite memory intensive, the recommendation is to create a new server (leave the domain as what it is meant for - administrative purpose only) and deploy each app on its own server.
So how do you configure this then?
To create a Managed Server in an existing domain:
1.If you have not already done so, in the Change Center of the Administration Console, click Lock & Edit (see Use the Change Center).
2.In the left pane of the Console, select Environment > Servers.
3.In the Servers table, click New.
4.On the Create a New Server: Server Properties page:
a.Enter the name of the server in the Name field.
Each server within a domain must have a name that is unique for all configuration objects in the domain. Within a domain, each server, machine, cluster, JDBC connection pool, virtual host, and any other resource type must be named uniquely and must not use the same name as the domain.
The server name is not used as part of the URL for applications that are deployed on the server. It is for your identification purposes only. The server name displays in the Administration Console, and if you use WebLogic Server command-line utilities or APIs, you use this name to identify the server.
b.In Listen Address, if you want to limit the valid addresses for a server instance, enter an IP address or DNS name. Otherwise, URLs to the server can specify any of the host computer's IP address, any DNS name that maps to one of the IP addresses, or the localhost string.
See Configuration Options.
c.In Listen Port, enter the port number from which you want to access the server instance.
If you run multiple server instances on a single computer, each server must use its own listen port.
d.Specify whether or not this server will be a stand alone server or will belong to a cluster.
If this server is part of a cluster:
•Select an existing cluster from the drop down list.
•Select the button to create a new cluster
See Create a cluster.
e.Click Next.
f.Review the configuration options you have chosen.
g.Click Finish.
5.To activate these changes, in the Change Center of the Administration Console, click Activate Changes.
Not all changes take effect immediately—some require a restart (see Use the Change Center).
Create and configure machines to run on UNIX
A machine is the logical representation of the computer that hosts one or more WebLogic Server instances. Each managed server must be assigned to a machine.
To create and configure
1.If you have not already done so, in the Change Center of the Administration Console, click Lock & Edit (see Use the Change Center).
2.In the Administration Console, expand Environment and select Machines. The Machines table displays in the right pane showing all the machines defined in the domain.
3.Click New.
4.Enter a name for the new machine in the Name attribute field.
This name is used to identify the machine within the WebLogic Server domain. This name does not have to correspond to the machine's network name.
5.Select UNIX in the Machine OS field.
6.Click Ok. The new machine is displayed in the Machines table.
7.Select the name of the machine you just created.
8.Select the Configuration tab, then select General.
a.To specify a non-privileged user account under which the server instance runs, place a check mark in the Enable Post-bind UID field and enter the user ID in the Post-Bind UID field.
The user ID that you enter must have read, write, and execute privileges within the BEA Home directory, the WebLogic Server product directory tree, and your domain directory.
The default value of the Post-Bind UID field, nobody, is a standard UNIX account that provides the least possible privileges. While the nobody account is acceptable for use in a development environment, in a production environment, BEA recommends that you create an operating-system user account specifically for running instances of WebLogic Server. See "Securing the WebLogic Server Host."
b.To specify a non-privileged group instead of (or in addition to) providing a user ID, place a check mark in the Enable Post-bind GID field and enter the group ID in the Post-Bind GID field.
9.Select the Node Manager tab.
a.Select the Node Manager type from the drop down box in the Type field.
For more information on different Node Manager types, see Node Manager Administrator's Guide.
b.Enter the DNS name or IP address upon which Node Manager listens in the Listen Address box.
If you identify the Listen Address by IP address, you must disable Host Name Verification on Administration Servers that will access Node Manager. For more information and instructions, see "Using Hostname Verification" in Managing WebLogic Security.
c.Enter a value in the Listen Port field. This is the port where Node Manager listens for incoming requests.
d.If you have set the Type field to SSH or RSH, you should specify values in the Node Manager Home and Shell Command fields.
For more information on configuring Node Manager using SSH or RSH, see Node Manager Administrator's Guide.
10.Click Save.
11.To activate these changes, in the Change Center of the Administration Console, click Activate Changes.
Not all changes take effect immediately—some require a restart (see Use the Change Center).
Assign server instances to machines
Before you begin
Ensure you have created a machine and the Managed Server you want to add to it. For information on creating a Managed Server, see Create Managed Servers.
1.If you have not already done so, in the Change Center of the Administration Console, click Lock & Edit (see Use the Change Center).
2.In the Administration Console, expand Environment and select Servers.
3.Click the name of the server to which you wish to assign a machine.
4.Click the Configuration tab, then click General.
5.Select the machine you want to assign the server to in the Machine field.
Note: You cannot change the machine of the Administation Server using the Administration Console. You cannot change the cluster or machine of a running server.
6.Click Save.
7.To activate these changes, in the Change Center of the Administration Console, click Activate Changes.
Finally configure the username and password under the Server -> Configuration -> Server Start
Then you can start the server using ./startManagedWebLogic.sh 81Platform http://localhost:7001
Previously, I simply created a single domain and deployed all my apps on the Admin domain. According to my tech support, this is not best practice. Since my company apps is deployed as separate war files and each war is quite memory intensive, the recommendation is to create a new server (leave the domain as what it is meant for - administrative purpose only) and deploy each app on its own server.
So how do you configure this then?
To create a Managed Server in an existing domain:
1.If you have not already done so, in the Change Center of the Administration Console, click Lock & Edit (see Use the Change Center).
2.In the left pane of the Console, select Environment > Servers.
3.In the Servers table, click New.
4.On the Create a New Server: Server Properties page:
a.Enter the name of the server in the Name field.
Each server within a domain must have a name that is unique for all configuration objects in the domain. Within a domain, each server, machine, cluster, JDBC connection pool, virtual host, and any other resource type must be named uniquely and must not use the same name as the domain.
The server name is not used as part of the URL for applications that are deployed on the server. It is for your identification purposes only. The server name displays in the Administration Console, and if you use WebLogic Server command-line utilities or APIs, you use this name to identify the server.
b.In Listen Address, if you want to limit the valid addresses for a server instance, enter an IP address or DNS name. Otherwise, URLs to the server can specify any of the host computer's IP address, any DNS name that maps to one of the IP addresses, or the localhost string.
See Configuration Options.
c.In Listen Port, enter the port number from which you want to access the server instance.
If you run multiple server instances on a single computer, each server must use its own listen port.
d.Specify whether or not this server will be a stand alone server or will belong to a cluster.
If this server is part of a cluster:
•Select an existing cluster from the drop down list.
•Select the button to create a new cluster
See Create a cluster.
e.Click Next.
f.Review the configuration options you have chosen.
g.Click Finish.
5.To activate these changes, in the Change Center of the Administration Console, click Activate Changes.
Not all changes take effect immediately—some require a restart (see Use the Change Center).
Create and configure machines to run on UNIX
A machine is the logical representation of the computer that hosts one or more WebLogic Server instances. Each managed server must be assigned to a machine.
To create and configure
1.If you have not already done so, in the Change Center of the Administration Console, click Lock & Edit (see Use the Change Center).
2.In the Administration Console, expand Environment and select Machines. The Machines table displays in the right pane showing all the machines defined in the domain.
3.Click New.
4.Enter a name for the new machine in the Name attribute field.
This name is used to identify the machine within the WebLogic Server domain. This name does not have to correspond to the machine's network name.
5.Select UNIX in the Machine OS field.
6.Click Ok. The new machine is displayed in the Machines table.
7.Select the name of the machine you just created.
8.Select the Configuration tab, then select General.
a.To specify a non-privileged user account under which the server instance runs, place a check mark in the Enable Post-bind UID field and enter the user ID in the Post-Bind UID field.
The user ID that you enter must have read, write, and execute privileges within the BEA Home directory, the WebLogic Server product directory tree, and your domain directory.
The default value of the Post-Bind UID field, nobody, is a standard UNIX account that provides the least possible privileges. While the nobody account is acceptable for use in a development environment, in a production environment, BEA recommends that you create an operating-system user account specifically for running instances of WebLogic Server. See "Securing the WebLogic Server Host."
b.To specify a non-privileged group instead of (or in addition to) providing a user ID, place a check mark in the Enable Post-bind GID field and enter the group ID in the Post-Bind GID field.
9.Select the Node Manager tab.
a.Select the Node Manager type from the drop down box in the Type field.
For more information on different Node Manager types, see Node Manager Administrator's Guide.
b.Enter the DNS name or IP address upon which Node Manager listens in the Listen Address box.
If you identify the Listen Address by IP address, you must disable Host Name Verification on Administration Servers that will access Node Manager. For more information and instructions, see "Using Hostname Verification" in Managing WebLogic Security.
c.Enter a value in the Listen Port field. This is the port where Node Manager listens for incoming requests.
d.If you have set the Type field to SSH or RSH, you should specify values in the Node Manager Home and Shell Command fields.
For more information on configuring Node Manager using SSH or RSH, see Node Manager Administrator's Guide.
10.Click Save.
11.To activate these changes, in the Change Center of the Administration Console, click Activate Changes.
Not all changes take effect immediately—some require a restart (see Use the Change Center).
Assign server instances to machines
Before you begin
Ensure you have created a machine and the Managed Server you want to add to it. For information on creating a Managed Server, see Create Managed Servers.
1.If you have not already done so, in the Change Center of the Administration Console, click Lock & Edit (see Use the Change Center).
2.In the Administration Console, expand Environment and select Servers.
3.Click the name of the server to which you wish to assign a machine.
4.Click the Configuration tab, then click General.
5.Select the machine you want to assign the server to in the Machine field.
Note: You cannot change the machine of the Administation Server using the Administration Console. You cannot change the cluster or machine of a running server.
6.Click Save.
7.To activate these changes, in the Change Center of the Administration Console, click Activate Changes.
Finally configure the username and password under the Server -> Configuration -> Server Start
Then you can start the server using ./startManagedWebLogic.sh 81Platform http://localhost:7001
Thursday, November 25, 2010
Deploy Axis2 on AIX
On WebLogic running on AIX, you will need to package the webservice into a .aar file before Axis2 can recognize the web service. On other operating systems like Windows, packaging the war file without the .aar file works fine!
Here's how you do it:
1. In Eclipse, navigate to the services directory via:
Project Name>WebContent>WEB-INF>services>

2. Right click on the service and click on Export

3. Choose General>Archive File and click on Next

4. Uncheck the service directory but ensure that all the subdirectories are checked. Make sure the file has the extension .aar and choose Finish.

5. Choose the overwrite the file if asked:

6. Next, export the service as a war for deployment. Right click on the project and choose Export

7. Choose war file to export

8. Specify the destination folder and click on Finish

9. Once the export to war is complete, deploy it on your App Server.

Here's how you do it:
1. In Eclipse, navigate to the services directory via:
Project Name>WebContent>WEB-INF>services>

2. Right click on the service and click on Export

3. Choose General>Archive File and click on Next

4. Uncheck the service directory but ensure that all the subdirectories are checked. Make sure the file has the extension .aar and choose Finish.

5. Choose the overwrite the file if asked:

6. Next, export the service as a war for deployment. Right click on the project and choose Export

7. Choose war file to export

8. Specify the destination folder and click on Finish

9. Once the export to war is complete, deploy it on your App Server.

Friday, September 17, 2010
Developing a webservice with Axis2 in Eclipse
1. Configure Axis2 in Eclipse (you need to download and unzip to a directory):
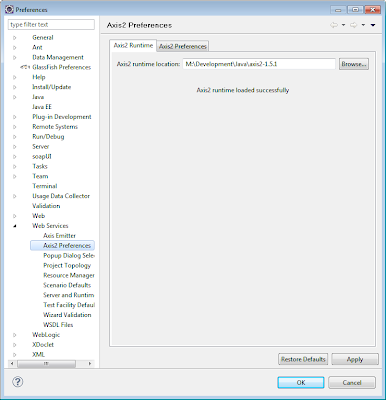
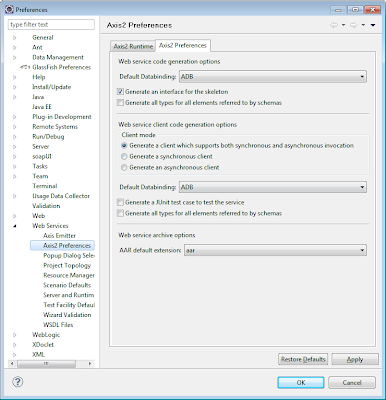
2. Ensure you select "Generate an interface for the skeleton".
3. Configure a server runtime to deploy the web service:
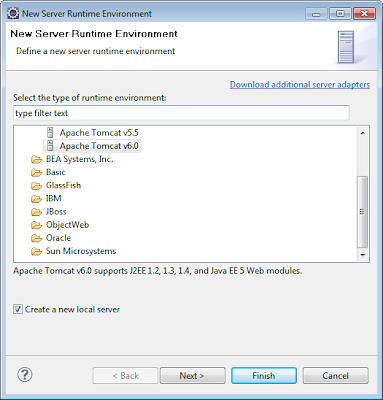
ensure you check "create a new local server"
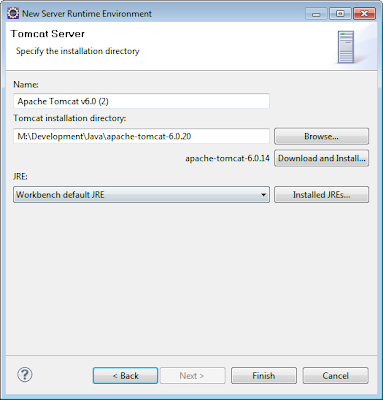
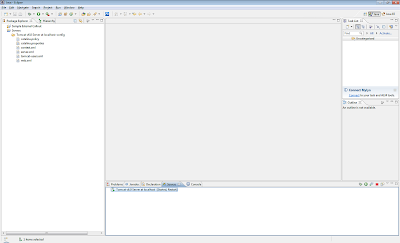
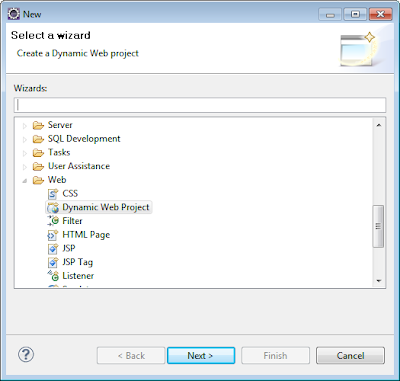
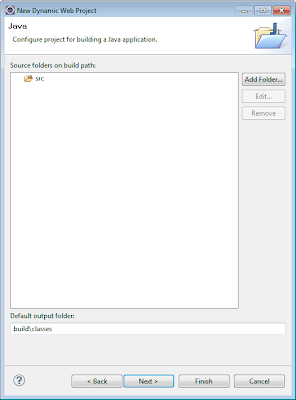
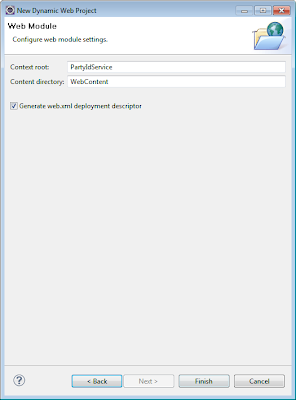
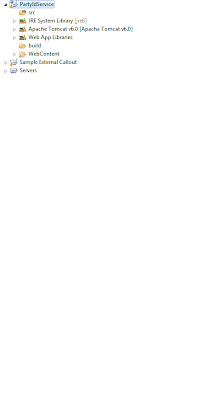
3. Create a new "Dynamic Web Project"
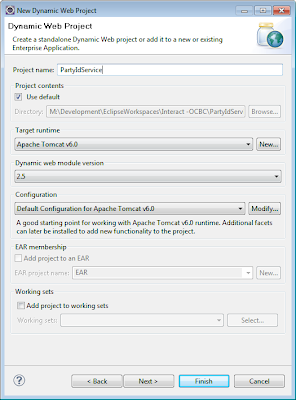
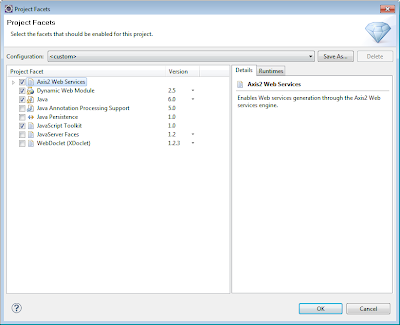
Under Configuration click "Modify" and ensure that Axis2 Web Service is selected.
4. Create a new class eg. PartyId and add in the methods
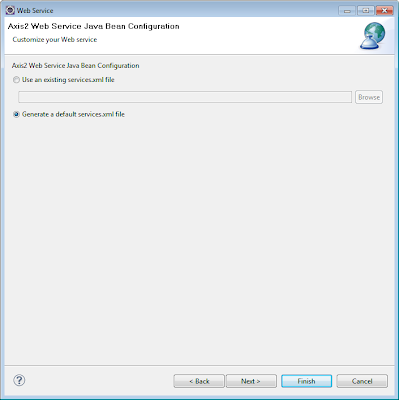
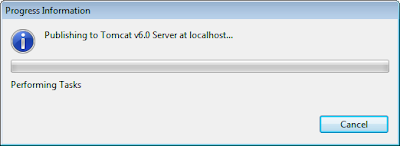
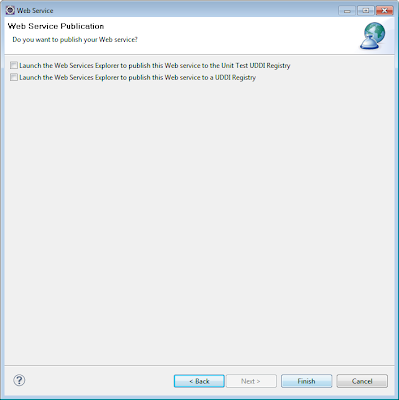
5. Create a WebService
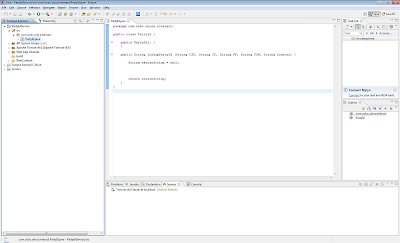
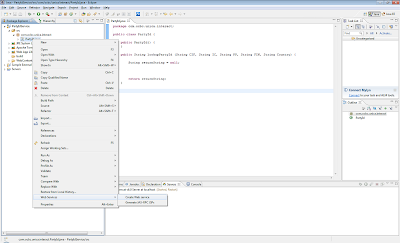
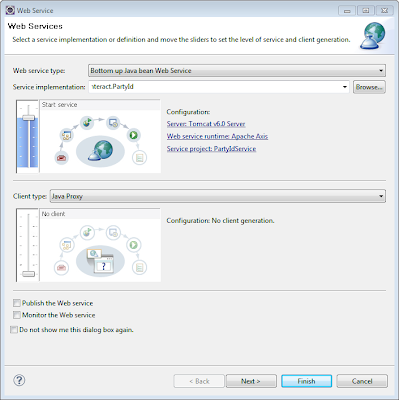
Ensure you choose Axis2 Runtime
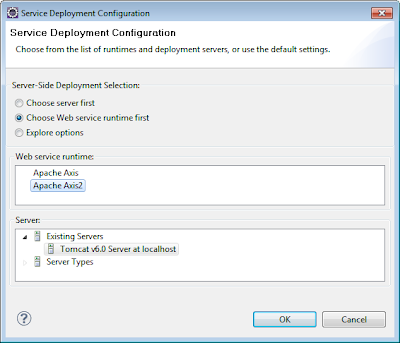
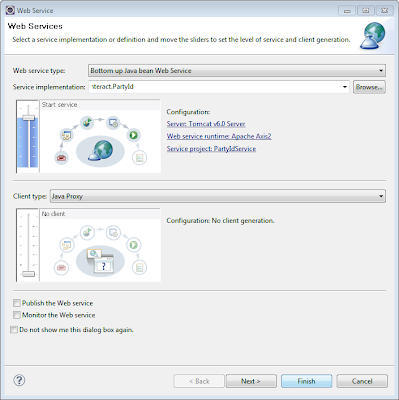
6. Run on the server
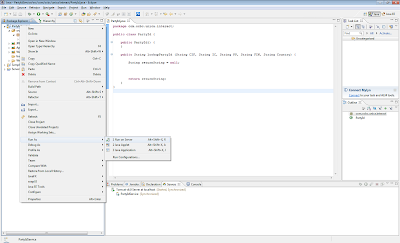
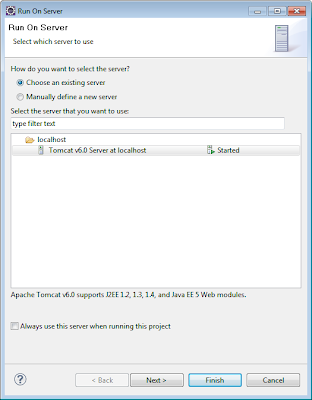
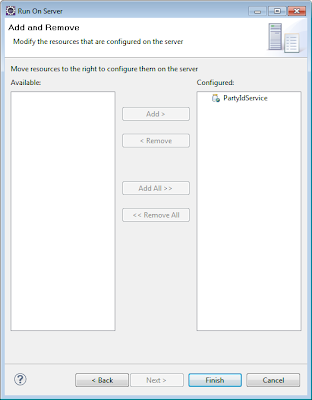
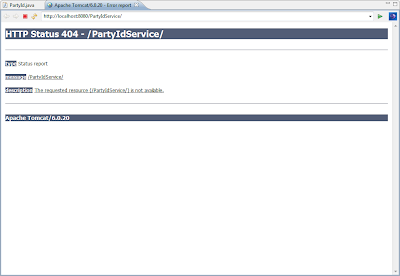
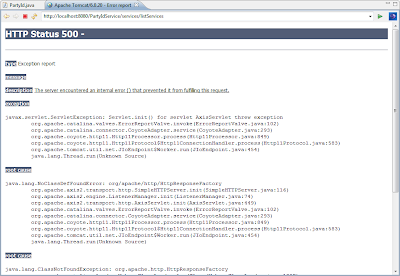
An error appears: change the url to : http://localhost:8080/PartyIdService/axis2-web/index.jsp
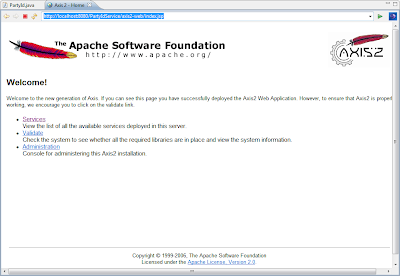
7. If error:
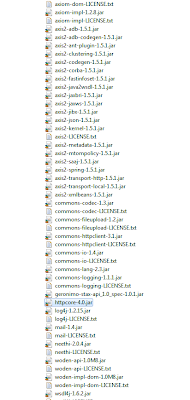
Edit the web.xml from the WEB-INF directory:
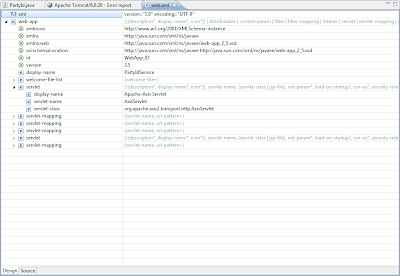
Change org.apache.axis2.transport.http.AxisServlet to
org.apache.axis2.webapp.AxisAdminServlet
(ensuring you are changing for Apache-Axis Admin Servlet Web Admin)
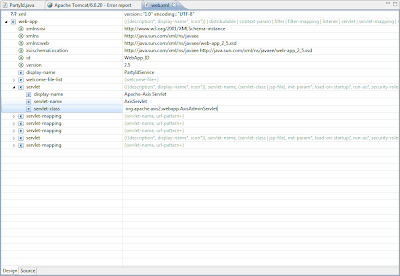
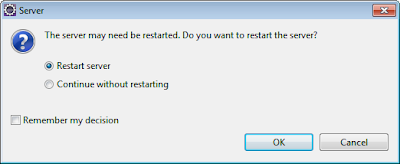
If asked for password, user : admin password : axis2
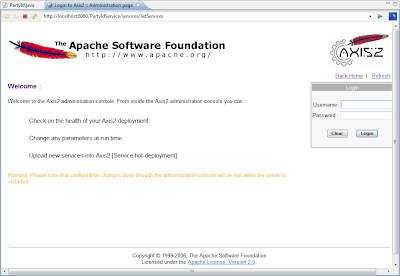
8. If successful, you should the following screens:
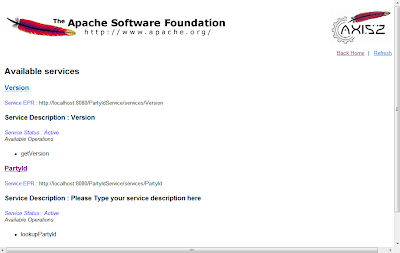
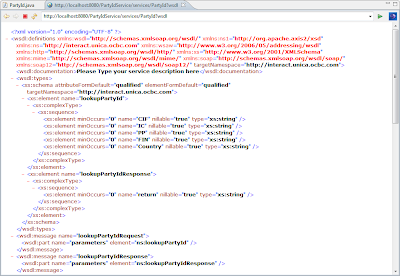

2. Ensure you select "Generate an interface for the skeleton".

3. Configure a server runtime to deploy the web service:

ensure you check "create a new local server"


3. Create a new "Dynamic Web Project"


Under Configuration click "Modify" and ensure that Axis2 Web Service is selected.


4. Create a new class eg. PartyId and add in the methods
5. Create a WebService


Ensure you choose Axis2 Runtime


6. Run on the server


An error appears: change the url to : http://localhost:8080/PartyIdService/axis2-web/index.jsp

7. If error:
Edit the web.xml from the WEB-INF directory:


Change org.apache.axis2.transport.http.AxisServlet to
org.apache.axis2.webapp.AxisAdminServlet
(ensuring you are changing for Apache-Axis Admin Servlet Web Admin)


If asked for password, user : admin password : axis2

8. If successful, you should the following screens:


Subscribe to:
Posts (Atom)